Become a Patron!

The Official Stagger/Fuse Thread

mach1ne

Gold Contributor
Member For 4 Years
so in the 'post your builds' thread, there is a ton of good information, questions and answers on everything from basic, to highly advanced builds and techniques. its quickly grown into an amazing resource, but its also quickly grown too large to find that info in. most of us have answered the same questions over and over again.

the idea for these 'the official x thread', is to get the information on 'x' (build/technique) all in one place so its easier to find, and consolidate the questions/answers/discussion a little bit, and leave that other thread for pics, chat and encouragement. links to all the 'official' threads are collected here, have a look through the rest for tips on everything from planning a build in steam-engine, beginner to advanced builds, and even coil photography. this is the official stagger/fuse thread. feel free to ask questions, post tips or tricks or anything related.

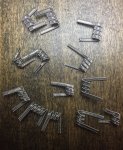
info: staggered fuse is a hard technique where you employ spaced clapton wraps using one of a few tricks we will discuss below, and a second pass of fuse wrap to combine two different elements/ingredients into one. the most basic example is the staggered fused clapton. it consists of two strands of spaced clapton wire, which are fused together during a second pass of claptoning in between the first spaced wraps. at its most advanced, the second pass is 'skip fused' into every second, third, fourth space, and 2nd, 3rd and 4th passes of fuse will add on different layers, or even staggering alien wraps in between spaced alien wraps. this technique is the foundation of many complex builds, so its an essential imo.

there are two parts to complete this technique, the spacing and the fusing. lets cover some of the spacing methods for round and square/rectangular elements. most of these use a second piece of wire to create the space in between the clapton wraps, and are mostly just variations on a way to hold it in place. the only one that doesnt use a wire is hand spacing. spacing by hand is hard to get consistent, but for some builds, it seems to be the best way (alien staggs).

the loop trick:
-this works best on round wire, and ok on perfectly square ribbon stacks (4 x .4mm or 3 x .3mm etc)
-pre-cut a piece of whatever gauge wrap wire you plan to use long enough to make the right sized loop out of (the right size being whatever works for you)
-start a clapton, but hold the spool ahead enough that the wraps dont touch
-do about an inch, then lock your wrap wire into the spool and set it down
-take your pre-cut wire and throw it over your clapton wraps and tie/twist the ends together so they make a loop
-set the loop right behind your wrap wire and hold the loop right beside the wrap wire, however you normally hold it when you are claptoning, and pull tension on the loop until its not slack
-tension is key here. if the wrap wire, or loop, are not equally tight, they will skip over eachother or make bad spacing
-too tight and you get all the other problems tension brings to the party
-hold a 90 degree angle to your cores so your spaced clapton wraps are nice and straight/vertical
-once you get tension and good spacing dialed in go fast and get it over with
loop.JPG
loop_close.JPG

the weighted loop:
-this is the same as the loop trick, but with a weight holding the loop down
-make sure you cut your loop wire so its able to hang free. likely a bit shorter than you would for a finger loop. this depends on the height of your drill/swivels
-common practice is to use an atomizer, so set up the loop like before, but take the drip tip off a goon or something, stick the end of the loop in the hole, and put the tip back in to pinch it in
-a trick i saw n.devine use is to also use one of those drawstring clamps that are on hoodies and jackets to stabilize the loop in between the atty thats hanging off it and the spinning core wire you are wrapping up. it works great btw
drawstringclamp.JPG

wieghtloopcap.JPG
once you get the clamp and atty on the loop, slide the clamp up close to the top and the weight will be very stable compared to without. if you cant find one of these things on a jacket or hoodie, try tape or anything else to cinch the loop up close to the top.
wieghtloop.JPG

the button trick:
-this is another way to hold the loop of wire
-this method is not for square stacks
-start a half inch or so of hand spaced clapton
-put your pre-cut piece of wire over the wraps like before, but this time stick both ends of the wire through a button, hold it tight and make sure your loop is right next to your wrap wire, then tie it in a tight knot
-cut a long enough piece of wire that its easy to tie the loop through the button and cut off the excess or just pull it out of the way so it doesnt tangle up in your work
-if its not tight enough, angle the button so the loop side (not the knot side) is facing you, and rotate the button 180 degrees. you should feel it get tight and kinda click into place
button1.JPG
button2.JPG
button3.JPG
button4.JPG

para-clapton
-this method requires a second spool of wire (or anything the proper gauge) to be wrapped onto your core wire in parallel with no spaces
-once you get to the end of the core wire, you unwrap the spacing wire (or whatever you used. ill use fishing line thats 38 gauge in the pics)
-this method is best for non-round things like ribbon stacks, but can be used to get tight, perfect spacing on anything
-its a waste of wire or whatever you use to parallel wrap with, but its one of the best ways to get perfect spacing
-there are a few ways to do this, but i like the zip-lock bag method
-take your two spools and put them in sandwich bags that have the zipper style top
-pull a couple inches of wire out of the bag, and close the zipper thing so its only opened and inch or two (with the wire poking out of the opening)
-set the bags on your lap, or on the floor by your feet, or on either side of your body/chair, or wherever you like them best. they can get a little tangled up in there and lift off your lap/the floor/poltergeist shit, but so far for me, they always end up just falling back down without getting in the way
-the key here is to hold your two wires tight together so they wrap in perfect parallel onto your core(s)
-when you are at the end of your core wire, fasten down your wrap wire and reverse your spacing wire off to reveal your perfect spacing
paraclapbags.JPG

i hit the picture limit, continued in next post
 
Last edited:

mach1ne

Gold Contributor
Member For 4 Years
heres an attempt to show the whole setup. the bags are on my lap at this point, but they were on the floor by the time i was done
paraclaplap.JPG
here you can see the fishing line in between the 38 ss316 on a 4 x .4mm staple stack
paraclapprogress.JPG

and one i forgot about is the forced clapton. its similar to para-clap, but you do a pass of normal/tightly spaced (but fairly loose tension) claptons, about half way down your core wire, then you cut it off (leave an inch or so to grab onto later) and go back to the start again. you do another pass of clapton right in between your first pass. it will stretch out to the proper/expected length, then you fasten the spaced wire down and reverse the second pass off. i totally forgot about this and i have never tried it, so no pics. i doubt this would work on any shaped ribbon stack.

there is also the spool tamer trick, which i know some people like as well. i have never used it intentionally (i did a stick of it by accident the first time i tried a spool tamer, then wrecked the sfc attempt on it right after lol), so i dont have pics. here is ohmboy josh making a set of staggered fused claptons using the technique:

that should be a good start on getting a spaced clapton to work with. now you have to fuse them together. depending on the build you are doing, youll either have two (or more) spaced pieces to fuse together (sfc, ssfc, half-dub, pitchforks etc), or one spaced piece and a bunch of bare wire, either framing or half framing it (staggerton variants and half-staggered stuff)

fusing multiple pieces:
-when you stack your spaced claptoned stuff into position to fuse together, make sure your spaces are aligned, and stay aligned, while you tie/glue/clamp it all solid. your fuse needs a clear path to land in.
-if any of your spacing is off it will make this much harder. prep is everything here.
-if the spaces are not lined up, you will have to go very slowly and weave your spool hand back and forth to catch the spaces. it still looks fine, but its a pain in the ass compared to the spaces lining up and going fast on the drill
-on round wire spaced cores, the wraps can move a little, which makes things easier. on ribbon stacks it usually grabs tight, so your only choice is to get them perfect so you dont need any wiggle room

fusing things to a single spaced clapton piece:
-i find this much easier, you just have to hold the right angle on your wrap wire and you can pretty much go as fast as you want if your spacing is good
-make sure your other wires are all straight and your prep is good so nothing goes wonky on you and it should be fairly smooth sailing

para-fuse:
-this is where you parallel clapton two wires into your spaced clapton wraps
-technique is the same as para-claptoning to get spaced wraps, you just have to make sure you did your spacing with the right gauge of wire (2x the width of the wire you are para-fusing, for example)
-i have never tried this, so i dont have any pics of how it looks, or impressions on how it performs

groove fuse:
-this is a slight variation on typical fuse, where you dont need spaced wrap to start with
-use a slightly larger clapton wrap on your first pass (like 36 or even 34 maybe) and do normal tight spacing
-align your claptoned pieces and then fuse them with something very small like 42+ in the grooves of the thicker clapton wraps
-i have only done this twice and i have not figured out the right ratio, or at least the ideal one, for clapton gauge to fuse gauge (but 36/42 looked fine, im just sure there is a 'perfect' size to fit the grooves. ill try 36/46 when my wire comes in and try to post pics. someone remind me in a week or two if i dont :cool:)
-i did a pretty rough job on both sets of these, but i remember thinking they seemed 'improved' compared to regular fused claptons on a series setup...

i did a couple of quick run-downs on how to do a stapled helix and a half-dub over in the staple thread, which are kinda relevant to this thread as well.

heres a few examples of builds using various staggered fuses:
alien stagg
alienstagg1.jpg
all ribbon stapled staggered fused clapton
sssfcc.jpg
half-dub
halfdub.jpg
metal snake spine
metalsnake.JPG
staggerton variant
stagg1.JPG
 
Last edited:

mach1ne

Gold Contributor
Member For 4 Years
Fantastic write ups mate :cheers: thank you very much for taking the time to pull all this together
thank you sir :cheers: hopefully they help some people get into this frustrating technique. this is my personal nightmare technique, and i have only become 'functional' with it in the last few months of really trying to focus my building time on it.

there are some real pros on the forum with this stuff. hopefully they will come in and correct/improve on what i managed to get out...
 

Zohmbiebuilds

Silver Contributor
Member For 3 Years
Great job bro. The weight method is the method I use. It's honestly the easiest. Fuck the button method. Either my wife or the button snap. It never fails to happen right after I have enough for half of my planned build.

Now, if you hold the drill tight I use the switch from a broken mech mod

Sent from my Z981 using Tapatalk
 

mach1ne

Gold Contributor
Member For 4 Years
Great job bro. The weight method is the method I use. It's honestly the easiest. Fuck the button method. Either my wife or the button snap. It never fails to happen right after I have enough for half of my planned build.

Now, if you hold the drill tight I use the switch from a broken mech mod

Sent from my Z981 using Tapatalk
thanks man. i hope you dont mind, i linked your braid thread into all the other official threads when i added this new one, so they are all linked to eachother.

and yeah, i am hit or miss with the button trick. when i was taking the pics and doing the build for this thread i got it to work great, but i generally just use the finger loop trick because i have more practice with it and its the fastest to set up. they all take a bit of learnin tho...
 

KingPin!

In my defence, I was left unsupervised ^^
VU Donator
Platinum Contributor
Member For 4 Years
VU Challenge Team
Reviewer
I twist the button once the stagger wire is in the right position then use a wooden peg underneath to hold it close to the core...seemed to have better result this way

Mostly use the weighted loop method though haven’t been able to master para clapton though I haven’t used ziplock bags with it... probably why
 

mach1ne

Gold Contributor
Member For 4 Years
I twist the button once the stagger wire is in the right position then use a wooden peg underneath to hold it close to the core...seemed to have better result this way

Mostly use the weighted loop method though haven’t been able to master para clapton though I haven’t used ziplock bags with it... probably why
try the ziplock thing man, its easy once you get over the bags floating around down there. try a fishing shop if you have one around you. consult a wire gauge chart and see the size of your preferred wrap gauge and try to find some line the same size. i managed to get 38g equivalent locally, but i live in kind of a fishing town. your mileage may vary depending on where you are situated. for me the fishing line was only a few bucks for 100 ft (just under half the price of a 100ft spool of 38 from most of the main wire suppliers).


edit - added a section on groove fuse
 
Last edited:

zephyr

Dirty Pirate Meg
VU Donator
Gold Contributor
Member For 4 Years
Unlisted Vendor
My core keeps breaking at the chuck because of the tension I'm putting on it. New drill won't do that cause it won't have a big gap in the middle of the chuck like this one does. I could do a bigger core or shorter stick but NAH GOT TO MAKE IT DIFFICULT

But hey, the loop on my finger seems to work

Edit: thanks @Carambrda , I'll do that next time, also will hold the loop across the core from the spool maybe to keep tension more equal on each side
 
Last edited:

Carambrda

Platinum Contributor
ECF Refugee
Member For 5 Years
To prevent the wire from snapping at the chuck of the drill, you can use a small piece of masking tape and wrap it around the wire a few times so that, when you insert that end into the drill, the masking tape is sticking halfway out of the drill. It acts like a cushion between the wire and the chuck.

When you fuse two spaced claptons together, align them in such a way that the spaces of one spaced clapton are aligned with the non-spaces of the other spaced clapton. Else, you'll end up zig-zagging your lead instead of keeping your lead at an invariable angle.

akik95.jpg
 

mach1ne

Gold Contributor
Member For 4 Years
Do your spools not go crazy and get birdsnested in a ziplock bag?
no the loose wire is kinda held in place by the partially closed zipper thing. all that happens to me is that the fishing line has a little more friction against the plastic bag so it will get snagged a bit as it slides in between the tight part of the zipper and lift off my lap/fall on the floor, but i have never had it come all the way up into the way of what im doing, or otherwise require any attention. give it a shot just with a single spool next time you are making decore for aliens or whatever.
 

Carambrda

Platinum Contributor
ECF Refugee
Member For 5 Years
Do your spools not go crazy and get birdsnested in a ziplock bag?
Only if you ordered the spools from Crazy Wire Company. :p The 36g Ni80 that you can see in the pic I posted is from Crazy Wire Company, but I got lucky because at the time when I built those coils I had only been into vaping for like 4 weeks so the ziploc technique was still completely unknown to me at that time, but sadly, so was the fact you have to align the two spaced claptons the way I explained it... so I ended up zig-zagging my lead all night long, and, it being my first coil build ever (yeah... I know that might sound a little bit crazy to most, but this was actually my first coil build), I took from noon till morning to finish my build. I've been taking very long vacations away from coil building ever since. I need those vacations... :cheers:
 

zephyr

Dirty Pirate Meg
VU Donator
Gold Contributor
Member For 4 Years
Unlisted Vendor
This big button is my best friend right now
And my new green machine :D
IMG_20180308_132243_crop_604x604.jpg IMG_20180308_132230-1008x756.jpg
IMG_20180308_132303_crop_604x604.jpg

This is definite progress! Now that I can get an even stagger to begin with I at least have a Chance at nice finished coils
Screenshot_20180308-134005.png
This is with 30/40, got to make it hard on myself of course
 
Last edited:

zephyr

Dirty Pirate Meg
VU Donator
Gold Contributor
Member For 4 Years
Unlisted Vendor
I twist the button once the stagger wire is in the right position then use a wooden peg underneath to hold it close to the core...seemed to have better result this way

Mostly use the weighted loop method though haven’t been able to master para clapton though I haven’t used ziplock bags with it... probably why

I twisted the button! Thanks man
 

KarmicRage

Silver Contributor
Member For 2 Years
Member For 1 Year
I find the button technique is best with a weight as well. Helps me get perfect spacing every time. You do need the wire as tight as you can get it though to be consistent. Also the wire being wrapped around shouldn't bounce back and forth as that will fuck up the consistency as well.

Sent from my MI MAX 2 using Tapatalk
 

zephyr

Dirty Pirate Meg
VU Donator
Gold Contributor
Member For 4 Years
Unlisted Vendor
I find the button technique is best with a weight as well. Helps me get perfect spacing every time. You do need the wire as tight as you can get it though to be consistent. Also the wire being wrapped around shouldn't bounce back and forth as that will fuck up the consistency as well.

Sent from my MI MAX 2 using Tapatalk

I twisted it 360 degrees the first time and it broke, 180 the second time and it seemed perfect. Definitely can't have bouncy cores ya lol, that's partly why the first time I tried a button it was a total wreck
 

mach1ne

Gold Contributor
Member For 4 Years
great work on the sfc @Pegleg Meg of course you had to do 30/40 for your first, you monster :cheers:

reading you two talking about the button and weights and stuff is making me think maybe the weighted loop trick would be better with a button on the loop instead of the drawstring clamp thing...or is that pretty much exactly what you are talking about @KarmicRage ?

I find the button technique is best with a weight as well.
 

KarmicRage

Silver Contributor
Member For 2 Years
Member For 1 Year
Proper monstrous isn't it? My first staggered fused Clapton was with 26g and 32g looked better than my first attempts as well haha. Basically I just mean a culmination of the 2 techniques weighted loop and button technique. What I tend to do is tie a button in place lightly, then I use a bull clip with a nut of fair size hooked onto it and clamp that onto the wire and twist it into place. Hope you understand an explanation of it, of not just let me know and I'll upload a pic of it set up :)

Sent from my MI MAX 2 using Tapatalk
 

KingPin!

In my defence, I was left unsupervised ^^
VU Donator
Platinum Contributor
Member For 4 Years
VU Challenge Team
Reviewer
I twisted it 360 degrees the first time and it broke, 180 the second time and it seemed perfect. Definitely can't have bouncy cores ya lol, that's partly why the first time I tried a button it was a total wreck

Oops should have mentioned how much I twist it ...yeah that much :)
 

KingPin!

In my defence, I was left unsupervised ^^
VU Donator
Platinum Contributor
Member For 4 Years
VU Challenge Team
Reviewer
Proper monstrous isn't it? My first staggered fused Clapton was with 26g and 32g looked better than my first attempts as well haha. Basically I just mean a culmination of the 2 techniques weighted loop and button technique. What I tend to do is tie a button in place lightly, then I use a bull clip with a nut of fair size hooked onto it and clamp that onto the wire and twist it into place. Hope you understand an explanation of it, of not just let me know and I'll upload a pic of it set up :)

Sent from my MI MAX 2 using Tapatalk

I originally fashionied this big ass bolt into my chuck wire holder before I got other clamps ......but it makes the perfect hanging weight for spacing now

62FA4FDB-98B7-4A6A-8414-6A1DA45559C0.jpeg 1E76AAF6-0E5F-470D-86B8-A056CDB9D162.jpeg
 

Carambrda

Platinum Contributor
ECF Refugee
Member For 5 Years
great work on the sfc @Pegleg Meg of course you had to do 30/40 for your first, you monster :cheers:

reading you two talking about the button and weights and stuff is making me think maybe the weighted loop trick would be better with a button on the loop instead of the drawstring clamp thing...or is that pretty much exactly what you are talking about @KarmicRage ?
I used the weighted button trick for that build I posted up thread. With 36g Ni80 the weighted button worked fine, but I later found that 38g Ni80 can snap too easily so I moved to the loop method because of that. You can hold tension on the loop with the tip of your pinky finger whilst holding your lead between your index finger and thumb:
Hand.jpg
 

mach1ne

Gold Contributor
Member For 4 Years
I used the weighted button trick for that build I posted up thread. With 36g Ni80 the weighted button worked fine, but I later found that 38g Ni80 can snap too easily so I moved to the loop method because of that. You can hold tension on the loop with the tip of your pinky finger whilst holding your lead between your index finger and thumb:
View attachment 106060
i usually hold the spool with my pinky. i have tried holding the loop with my middle finger in a similar way to your pic, but i find its easier to just hold the loop in your normal claptoning grip because i have more practice like that. yeah it gets harder the higher you go in gauge. you can get away with using the loop trick on perfectly square stacks of ribbon (3 x.3mm etc), but if you try to do that with 40 the loop will get shredded to bits eventually by the corners of the stack.
 

Carambrda

Platinum Contributor
ECF Refugee
Member For 5 Years
i usually hold the spool with my pinky. i have tried holding the loop with my middle finger in a similar way to your pic, but i find its easier to just hold the loop in your normal claptoning grip because i have more practice like that. yeah it gets harder the higher you go in gauge. you can get away with using the loop trick on perfectly square stacks of ribbon (3 x.3mm etc), but if you try to do that with 40 the loop will get shredded to bits eventually by the corners of the stack.
I don't hold the spool because that is what the ziploc is for. :giggle:
 

AnthonyLouis

Silver Contributor
Member For 4 Years
Unlisted Vendor
I find the button technique is best with a weight as well. Helps me get perfect spacing every time. You do need the wire as tight as you can get it though to be consistent. Also the wire being wrapped around shouldn't bounce back and forth as that will fuck up the consistency as well.

Sent from my MI MAX 2 using Tapatalk

I have “core holders” (really drawstring clamp thingies) that I got when I ordered my spin LT. I usually put that on my loop against the cores and tie the other end at the fishing weight.

I tried the button method before I went to the bait and tackle shop to buy my weights. I kept it real tight against the core but for some reason it always slightly slanted on me while I went faster.... don’t get me wrong, I still made it work.. I would just loosen up the wrap at the end so it would move a bit so when I fused it would move into the fusing. I just prefer the fishing weight, it just gives me perfect (well as perfect it could be without parafusing) spacing every time and I don’t gotta worry. I can usually go full speed with the drill and the weight will still hold its place. The button just moved ever so slightly


Sent from my iPhone using Tapatalk
 

zephyr

Dirty Pirate Meg
VU Donator
Gold Contributor
Member For 4 Years
Unlisted Vendor
So...what do y'all do for multiple ribbon cores? I will be getting more spools of 40 today so I may try paraclaptoning, wondering if any of these will work for not-square ribbon stacks? Weighted loop?
 

mach1ne

Gold Contributor
Member For 4 Years
So...what do y'all do for multiple ribbon cores? I will be getting more spools of 40 today so I may try paraclaptoning, wondering if any of these will work for not-square ribbon stacks? Weighted loop?
para-clap is pretty much the best way to do a non-square ribbon stack (and technically its the best way to do a square one too imo), its just painful wasting half the wire. especially if you plan to use something as thin as 40.
 

zephyr

Dirty Pirate Meg
VU Donator
Gold Contributor
Member For 4 Years
Unlisted Vendor
para-clap is pretty much the best way to do a non-square ribbon stack (and technically its the best way to do a square one too imo), its just painful wasting half the wire. especially if you plan to use something as thin as 40.

Alright. Would it be asking too much to try to frame a staggered ribbon core with staggered frames?
 

mach1ne

Gold Contributor
Member For 4 Years
Alright. Would it be asking too much to try to frame a staggered ribbon core with staggered frames?
i have a feeling that i would be asking too much to try that, but you will probably be fine (given your propensity to succeed) :cheers: the most i have tried so far is fusing two things together with spaced wraps...and i have only ever tried it with 38.
 

zephyr

Dirty Pirate Meg
VU Donator
Gold Contributor
Member For 4 Years
Unlisted Vendor
i have a feeling that i would be asking too much to try that, but you will probably be fine (given your propensity to succeed) :cheers: the most i have tried so far is fusing two things together with spaced wraps...and i have only ever tried it with 38.

You should see the bird's nest in a quart ziploc bag I have haha, had to separate my ribbon bits into a jar because my hand will get stuck in there now trying to get binding wire
 

zephyr

Dirty Pirate Meg
VU Donator
Gold Contributor
Member For 4 Years
Unlisted Vendor
thats why most people give up/cant make their own coils :cheers:


awesome! where do you get custom labels?

From KBee's wholesale, but be warned Anthony and other people have gotten really shitty wire from there, Anthony recently, on the Kbee thread
 

mach1ne

Gold Contributor
Member For 4 Years
the other night when i was working on my photography setup i installed all my old 'work' software for the first time in a couple years (adobe cc). the idea of custom labels is making me want to spend the day on a cool logo treatment in illustrator :shades:
 

Branpro

Member For 4 Years
Great write up! I prefer the button method myself, and just twist it tight as heck. As long as you keep the feed wire at 90 to the core, it does the job. I’ve never tried the weight method, but the reviews on here, have me plotting a test run asap lol.
 

Branpro

Member For 4 Years
Awaiting my latest wire order (smaller gauges). Recently I have gone down the rabbit hole of this winding fashion lol. Here is the last few days of trial and error with different gauges and metals. I use a hand drill set up I made, for the fusing/framing, provides a hands on feeling imo. Cheers.
 

Attachments

  • CAE06A09-EDF4-4F78-81F5-D6D833D1B286.jpeg
    CAE06A09-EDF4-4F78-81F5-D6D833D1B286.jpeg
    965.6 KB · Views: 30

mach1ne

Gold Contributor
Member For 4 Years
Awaiting my latest wire order (smaller gauges). Recently I have gone down the rabbit hole of this winding fashion lol. Here is the last few days of trial and error with different gauges and metals. I use a hand drill set up I made, for the fusing/framing, provides a hands on feeling imo. Cheers.
some great work there :cheers:
 

zephyr

Dirty Pirate Meg
VU Donator
Gold Contributor
Member For 4 Years
Unlisted Vendor
I ordered a couple of 320lb test swivels today, Krok ball bearing. The swivels I have now haven't locked yet but I can see they probably will if I put as much tension as I really want to do more staggering
 

KingPin!

In my defence, I was left unsupervised ^^
VU Donator
Platinum Contributor
Member For 4 Years
VU Challenge Team
Reviewer
I ordered a couple of 320lb test swivels today, Krok ball bearing. The swivels I have now haven't locked yet but I can see they probably will if I put as much tension as I really want to do more staggering

Let me if they are decent those ones a lot of you use the tsunami pro ones are hard to get hold of over in the uk
 

zephyr

Dirty Pirate Meg
VU Donator
Gold Contributor
Member For 4 Years
Unlisted Vendor
JRiley told me about using a straw for wider staggers, I found this amazing video just now showing a different stagger technique with a clamp and masking tape, plus the straw for fusing!!!! I skipped the talking in the beginning


Dang I'm excited to try this all over again!!!
 
Last edited:

VU Sponsors

Top