Introduction
There’s a lot to cover, so as much as I like writing introductions, I’ll jump straight into the review.

Product overview
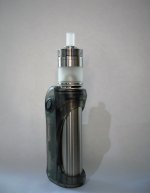
The Pioneer 1.5 is a 22mm DL/RDL/MTL RTA, with slide top-fill, and 3.2ml juice capacity.
What do you get?

First impressions
My first thoughts on the 1.5 were that it looks almost identical to the original, apart from a different drip-tip design and some knurling on the airflow control ring, it’s all the same.
However, appearances can be deceptive – and the 1.5 has a few functional differences from the original.

One thing they didn’t fix
Screwing the tank into the base was awkward on the original, and it’s still awkward on the 1.5, Try and force it and you’re going to cross the threads. On the original, I found the easiest way was to push the tank onto the base, almost as if it was press-fit, and then tighten it up. On the 1.5, the easiest way is to align everything, and then rotate the tank backwards, feel it drop into place and then screw it up, while not applying much pressure. Either way, it’s not a deal breaking, but still slightly annoying.

Build
Firstly, a complaint. Everything on this RTA is tiny and fiddly, the deck screws, the condenser screw, the screws for the chimney – all tiny. It doesn’t make setting up this RTA impossible, it just adds an element of annoyance, especially for people like me with awful eyesight.
Putting the coil in, is almost the same as with the original Pioneer RTA – slightly bend your coil legs to clear the condenser, slide the coil into the posts, tighten, center and align and you’re done. This is slightly easier on the 1.5 as there is a small channel to rest your coiling rod in.

Wicking is slightly different, as there’s now a raised deck. With the original, you wicked it almost like an RDA, but with the 1.5 you’re feeding the wick through wicking slots. No matter, it’s still really easy to do. With MTL builds, it doesn’t seem to matter how long the wicks are, I tried them cut in line with the base, I tried them longer – it all works. With a restricted DL build, I was a little more careful, wick cut no longer than the outside of the base, with some fluffing/thinning and the tips of the wick, carefully placed into the slots, rather than stuffed in as far as they will go.

How does it perform?
So far, I’ve tried three builds:
You could probably fit a chunky 3.0mm coil in this RTA, however while the wicking slots are very good for 2.5mm MTL builds, I can’t see them allowing the sort of juice flow that a chunky coil at 40w+ would require.
Once I put in the tobacco chimney, the apple was removed from the mix – the flavor I got was pure tobacco, but it was a much drier vape – no lack of flavor, just less saturation, far more like smoking an actual cigarette than with the regular chimney. I was also able to push the wattage a little more using this chimney.


Conclusion
This is a hard conclusion to write, because there are so many perspectives:
The Pioneer V1.5 RTA was provided for the purposes of this review by Sourcemore, who also provided me with the discount code PIOV15 which will reduce the price from $49.99 to $34.19
There’s a lot to cover, so as much as I like writing introductions, I’ll jump straight into the review.
Product overview
The Pioneer 1.5 is a 22mm DL/RDL/MTL RTA, with slide top-fill, and 3.2ml juice capacity.
What do you get?
- Pioneer 1.5 RTA (fitted with MTL positive post, and 0.8mm airflow pin.
- Tobacco/DL chimney
- DL drip-tip
- DL positive post + DL positive contact
- 1.0mm, 1.2mm, 1.5mm, 2.0mm and 2.9mm airflow pins
- 1×28g Ni70 MTL coil
- 1×28g 2+40g RDL coil
- 1×26g 2+40g DL coil
First impressions
My first thoughts on the 1.5 were that it looks almost identical to the original, apart from a different drip-tip design and some knurling on the airflow control ring, it’s all the same.
However, appearances can be deceptive – and the 1.5 has a few functional differences from the original.
- Slide fill - unlike the original’s bayonet style top-cap, the 1.5 has a slide-fill system. This is a nice improvement, when the top-cap is fully screwed on, the slide mechanism is locked in place, rotate it a tiny amount and you can slide open, and then secure it by rotating the top-cap back to the original position.
- Airflow control ring - with the original, the airflow control ring was really tight and hard to adjust, I had to remove the RTA from the mod to do it. The 1.5 has no such issues, airflow is adjustable while the RTA is on the mod.
One thing they didn’t fix
Screwing the tank into the base was awkward on the original, and it’s still awkward on the 1.5, Try and force it and you’re going to cross the threads. On the original, I found the easiest way was to push the tank onto the base, almost as if it was press-fit, and then tighten it up. On the 1.5, the easiest way is to align everything, and then rotate the tank backwards, feel it drop into place and then screw it up, while not applying much pressure. Either way, it’s not a deal breaking, but still slightly annoying.
Build
Firstly, a complaint. Everything on this RTA is tiny and fiddly, the deck screws, the condenser screw, the screws for the chimney – all tiny. It doesn’t make setting up this RTA impossible, it just adds an element of annoyance, especially for people like me with awful eyesight.
Putting the coil in, is almost the same as with the original Pioneer RTA – slightly bend your coil legs to clear the condenser, slide the coil into the posts, tighten, center and align and you’re done. This is slightly easier on the 1.5 as there is a small channel to rest your coiling rod in.
Wicking is slightly different, as there’s now a raised deck. With the original, you wicked it almost like an RDA, but with the 1.5 you’re feeding the wick through wicking slots. No matter, it’s still really easy to do. With MTL builds, it doesn’t seem to matter how long the wicks are, I tried them cut in line with the base, I tried them longer – it all works. With a restricted DL build, I was a little more careful, wick cut no longer than the outside of the base, with some fluffing/thinning and the tips of the wick, carefully placed into the slots, rather than stuffed in as far as they will go.
How does it perform?
So far, I’ve tried three builds:
- Traditional MTL
- Loose MTL
- Restricted DL
You could probably fit a chunky 3.0mm coil in this RTA, however while the wicking slots are very good for 2.5mm MTL builds, I can’t see them allowing the sort of juice flow that a chunky coil at 40w+ would require.
- Chamber condenser
- Tobacco/DTL chimney
Once I put in the tobacco chimney, the apple was removed from the mix – the flavor I got was pure tobacco, but it was a much drier vape – no lack of flavor, just less saturation, far more like smoking an actual cigarette than with the regular chimney. I was also able to push the wattage a little more using this chimney.
- Airflow pins
Conclusion
This is a hard conclusion to write, because there are so many perspectives:
- Personal perspective – I love this RTA, I loved the original, and this does most things the original does just as well, some things a little better, and then adds a lot of new stuff.
- Upgrade from the original – if you loved the original and want to buy the 1.5 to vape in exactly the same way, there aren’t any performance increases, but because of the slide-fill and easier airflow adjustment, it’s a slight improvement.
- Never used the Pioneer – this is a great MTL to RDL RTA, that covers a lot of different vaping styles really well.
- New vapers – while the actual build is simple, there’s a lot of configurations to consider, and it’s a little fiddly.
The Pioneer V1.5 RTA was provided for the purposes of this review by Sourcemore, who also provided me with the discount code PIOV15 which will reduce the price from $49.99 to $34.19