Hellbilly’s Review of Smok Alien 220w Mod
Howdy, folks, Hellbilly here and I’ll be giving my review of the Smok Alien 220w Mod. Before I get into that though, I’d like to just take a few seconds and say thank you for taking the time to read and consider my review of this mod.
Disclosure:
The views and opinions expressed belong solely to me and do not, in any way, reflect those of any third party, vendor, or sponsors. All views and opinions are subjective and should be taken with a grain of salt. This review is based solely from my personal experiences. My opinions are and will remain unbiased. This product was purchased out of pocket at my local vape shop and was NOT sent to me for the purpose of this review.
Now, with all the formalities out of the way let’s go on ahead and get down to business.
The Smok Alien 220w Mod:
I’ve been using this mod now for about a month and I feel I’ve given it sufficient time for a just and accurate review.
We’ll go over the specs and details here for just a minute:
Dimensions: 44 x 30 x 85mm (1.73 x 1.18 x 3.35in)
Watt Range: 6W – 220W
Temperature Range: 200°F-600°F/100°C-315°C
Volt Range: 0.35V-8V
Resistance Range: 0.1Ω-3.0Ω (VW Mode) and 0.06Ω-2.00Ω (TC Mode)
Compatible TC Wires: Ni200 (Nickel), Ti (Titanium), SS (Stainless Steel)
Large OLED Display
Individual Battery Level Display
Material: Zinc Alloy
Battery: External 18650 x2 (Not included)
510 Connection: Spring Loaded
Weight: 0.230kg (8.113oz)
(Note: The pictures displayed are for the Alien 220w Kit this review is JUST for the Mod and NOT the full kit)

In the Box:
Smok Alien 220w TC Box Mod
Firmware Upgrade/Charging Cable
Using the Mod:
The packaging for this item is exactly what you would expect from Smok. Take off the plastic wrap, and your left with the beautifully designed sleeve with the product image. Removing the sleeve reveals an elegantly simple black box with the Smok logo printed on the top. Opening the box, you’ll see your Mod sitting in the foam protection beautifully.

This mod feels nice in the hand as far as size and weight. It doesn’t feel too big and bulky, and not heavy at all. The hinged battery door feels very solid, as does the rest of this mod.
Installing the batteries:
A simple press up on the door, and with a gentle slide forward the battery door is open exposing the terminals. Insert the batteries, following the guide located just on the inside of the door, or printed large and in color on the inside of the battery terminal.


(The minor scratches are from normal use over the course of the past month)
And these pictures bring me to discuss the visible condition of the mod, the paint does not hold up well against everyday use. It has never been dropped or handled roughly, but there are visible scratches in the paint. I have heard of people losing all the paint from their mod within a few weeks. Not a huge factor for me, as I am not overly concerned with the minor scuffs and scratches, and aside from those it still looks nice in my opinion.
Insert the batteries and you’ll notice it gets a bit heavier, obviously, but still not too heavy. The screen will come on flashing the Smok logo and the version of the firmware your device is using.

(I am using version 1.2.2 firmware. 1.2.1 Is what your device will come with OOB.)
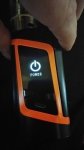
You can get a general idea of how big and bright the screen is here.

(The firebar extends much of the way down the side of this mod. A very nice feature in my opinion. Never have to worry about “missing” or “finding” the fire button.)
Powering your device on:
When you power the device on (by pressing the fire bar 5 times quickly) the screen will flash the displays again, in sequence while booting and then take you to the main display.
Let’s go over the display since we’ve got this picture pulled up. Starting from the Top left, you’ll see the number indicative of your power (VW) setting or temperature (TC). Next, you’ll see the “S” in the box which indicates the “soft” hit setting. It gives 3 settings here, “Soft,” “Normal,” and “Hard.” I have tried all 3 settings and I can’t find a notable difference, to be honest. Under this you will see the “W” indicating we are in Wattage (Power/VW) mode. Then you have your independent battery level indicators for both the “A” terminal and “B” terminal respectively. Moving down to the next line, you’ll see your Volts, Ohms, and Amps. Notice the Volts are at 0.000, they will change once you the fire the device to take a hit which I will post a picture of shortly. Ohms are at 0.219, and to turn on the display is pulling 0.228 amps. Then below that you have: Mode: PCB (Printed Circuit Board temperature), and Puff counter. You’ll see I’m running in Wattage mode, the circuit board is at 24°C and I am at 504 puffs since I changed my firmware (which does reset your puff counter automatically. You can also reset it in the menu which I will go over later). Then, at the very bottom you have your hit timer. Mine is reading at 0.0S as I just pressed the fire button to turn on the display. Also, at the bottom of the screen are your control adjustment buttons, but they aren’t wanting to show up too good in the picture. Your minus button is on the left side, and your plus button is on the right though.

(I took a hit to display the Volt measurement which you can see is at 5.524, my amps have increased to 25.22, and the hit timer is displaying 5.6 seconds)
Navigating the Menu:
Pressing the fire bar 3 times will open the menu.
(These are your options in the menu which I will go over the options in each one)


To make selections you can long press the firebar, and to navigate the menu you can use the + button or short press the firebar to go to the right, and the minus button to go to the left.
MODE MENU:
So, your first menu option is “Mode” and through this setting you will have 3 options. Watt Mode (Power or VW), Temp Mode, and Memory Mode.
POWER MODE:
Going over power mode is quick and easy. Select power mode, select your hit level (Soft, Normal, or Hard), using the +/- buttons set your desired wattage and start vaping.
TEMPRATURE CONTROL MODE:
Now, TC mode is going to be a little more time consuming, but not overwhelmingly so, you’ll open the menu, select temp mode. You will then be prompted to select your desired wattage, then be asked to select your coil type, and then your TCR (Temperature Control Curve). Again, this mod will support Nickel (Ni), Stainless Steel (SS), and Titanium (Ti). Nickel and Titanium should not require you to adjust the TCR numbers. However, if you’re using Stainless Steel coils you will need to adjust the TCR to match your specific wire unless you are using SS304. But, just to help you guys out here’s a list of TCR settings for each wire.
Ni200: 0.00620
Ti01: 0.00350
SS316L: 0.00092
SS316: 0.000915
SS317L: 0.00088
SS317: 0.000875
SS304: 0.00105
SS430: 0.00138
SS410: 0.00155
If you’re using this mod in TC mode, it may be necessary to double check the TCR settings when you first switch over just to verify that the numbers are at the proper settings.
MEMORY MODE:
Memory mode is used to save various power settings, you have a total of 22 settings that can be saved. You can switch between these by short pressing on the firebar. You can adjust the setting by pressing the +/- buttons. To save the setting and set your device long press the firebar.
PUFFS MENU:
The puffs menu will allow you to limit the maximum number of puffs, from “NEVER” to 999. Make your selection by long pressing the firebar. This will prompt you with the question, “Would you like to reset your puffs?” Answer this by pressing the corresponding +/- button. Minus = Y; Plus = N.
SETTINGS MENU:
From this menu you can adjust the screen time, screen lock, contrast, ohms (which you can use to adjust if the reading is inaccurate after installing a new coil), and you can set it to download the newest firmware (when it’s connected to a PC, even though Smok tells you on the website to remove the batteries before plugging the device up to your computer which removes all the functionality of the device).
I feel the menu selections here are self-explanatory enough that you don’t really need me to go over them with you.
POWER MENU:
This menu feature allows you to power your device off.
HIDDEN FEATURES???:
So, while trying to power my device off, I pressed the firebar 5 times in rapid succession thinking this would power the device off, but instead it locks the device. In my opinion, this is a great feature because I can now safely use this device to build my coils on without having to worry about accidentally pressing the firebar. Also, I can safely store the device in my pocket without worrying about accidentally pressing the *large* firebar on accident.
In my opinion, it has some nice features. I love the size and the information displayed on the screen. This is only the second mod I have owned, but it has been my go to mod since I got it.
Howdy, folks, Hellbilly here and I’ll be giving my review of the Smok Alien 220w Mod. Before I get into that though, I’d like to just take a few seconds and say thank you for taking the time to read and consider my review of this mod.
Disclosure:
The views and opinions expressed belong solely to me and do not, in any way, reflect those of any third party, vendor, or sponsors. All views and opinions are subjective and should be taken with a grain of salt. This review is based solely from my personal experiences. My opinions are and will remain unbiased. This product was purchased out of pocket at my local vape shop and was NOT sent to me for the purpose of this review.
Now, with all the formalities out of the way let’s go on ahead and get down to business.
The Smok Alien 220w Mod:
I’ve been using this mod now for about a month and I feel I’ve given it sufficient time for a just and accurate review.
We’ll go over the specs and details here for just a minute:
Dimensions: 44 x 30 x 85mm (1.73 x 1.18 x 3.35in)
Watt Range: 6W – 220W
Temperature Range: 200°F-600°F/100°C-315°C
Volt Range: 0.35V-8V
Resistance Range: 0.1Ω-3.0Ω (VW Mode) and 0.06Ω-2.00Ω (TC Mode)
Compatible TC Wires: Ni200 (Nickel), Ti (Titanium), SS (Stainless Steel)
Large OLED Display
Individual Battery Level Display
Material: Zinc Alloy
Battery: External 18650 x2 (Not included)
510 Connection: Spring Loaded
Weight: 0.230kg (8.113oz)
(Note: The pictures displayed are for the Alien 220w Kit this review is JUST for the Mod and NOT the full kit)
In the Box:
Smok Alien 220w TC Box Mod
Firmware Upgrade/Charging Cable
Using the Mod:
The packaging for this item is exactly what you would expect from Smok. Take off the plastic wrap, and your left with the beautifully designed sleeve with the product image. Removing the sleeve reveals an elegantly simple black box with the Smok logo printed on the top. Opening the box, you’ll see your Mod sitting in the foam protection beautifully.
This mod feels nice in the hand as far as size and weight. It doesn’t feel too big and bulky, and not heavy at all. The hinged battery door feels very solid, as does the rest of this mod.
Installing the batteries:
A simple press up on the door, and with a gentle slide forward the battery door is open exposing the terminals. Insert the batteries, following the guide located just on the inside of the door, or printed large and in color on the inside of the battery terminal.
(The minor scratches are from normal use over the course of the past month)
And these pictures bring me to discuss the visible condition of the mod, the paint does not hold up well against everyday use. It has never been dropped or handled roughly, but there are visible scratches in the paint. I have heard of people losing all the paint from their mod within a few weeks. Not a huge factor for me, as I am not overly concerned with the minor scuffs and scratches, and aside from those it still looks nice in my opinion.
Insert the batteries and you’ll notice it gets a bit heavier, obviously, but still not too heavy. The screen will come on flashing the Smok logo and the version of the firmware your device is using.
(I am using version 1.2.2 firmware. 1.2.1 Is what your device will come with OOB.)
You can get a general idea of how big and bright the screen is here.
(The firebar extends much of the way down the side of this mod. A very nice feature in my opinion. Never have to worry about “missing” or “finding” the fire button.)
Powering your device on:
When you power the device on (by pressing the fire bar 5 times quickly) the screen will flash the displays again, in sequence while booting and then take you to the main display.
Let’s go over the display since we’ve got this picture pulled up. Starting from the Top left, you’ll see the number indicative of your power (VW) setting or temperature (TC). Next, you’ll see the “S” in the box which indicates the “soft” hit setting. It gives 3 settings here, “Soft,” “Normal,” and “Hard.” I have tried all 3 settings and I can’t find a notable difference, to be honest. Under this you will see the “W” indicating we are in Wattage (Power/VW) mode. Then you have your independent battery level indicators for both the “A” terminal and “B” terminal respectively. Moving down to the next line, you’ll see your Volts, Ohms, and Amps. Notice the Volts are at 0.000, they will change once you the fire the device to take a hit which I will post a picture of shortly. Ohms are at 0.219, and to turn on the display is pulling 0.228 amps. Then below that you have: Mode: PCB (Printed Circuit Board temperature), and Puff counter. You’ll see I’m running in Wattage mode, the circuit board is at 24°C and I am at 504 puffs since I changed my firmware (which does reset your puff counter automatically. You can also reset it in the menu which I will go over later). Then, at the very bottom you have your hit timer. Mine is reading at 0.0S as I just pressed the fire button to turn on the display. Also, at the bottom of the screen are your control adjustment buttons, but they aren’t wanting to show up too good in the picture. Your minus button is on the left side, and your plus button is on the right though.
(I took a hit to display the Volt measurement which you can see is at 5.524, my amps have increased to 25.22, and the hit timer is displaying 5.6 seconds)
Navigating the Menu:
Pressing the fire bar 3 times will open the menu.
(These are your options in the menu which I will go over the options in each one)
To make selections you can long press the firebar, and to navigate the menu you can use the + button or short press the firebar to go to the right, and the minus button to go to the left.
MODE MENU:
So, your first menu option is “Mode” and through this setting you will have 3 options. Watt Mode (Power or VW), Temp Mode, and Memory Mode.
POWER MODE:
Going over power mode is quick and easy. Select power mode, select your hit level (Soft, Normal, or Hard), using the +/- buttons set your desired wattage and start vaping.
TEMPRATURE CONTROL MODE:
Now, TC mode is going to be a little more time consuming, but not overwhelmingly so, you’ll open the menu, select temp mode. You will then be prompted to select your desired wattage, then be asked to select your coil type, and then your TCR (Temperature Control Curve). Again, this mod will support Nickel (Ni), Stainless Steel (SS), and Titanium (Ti). Nickel and Titanium should not require you to adjust the TCR numbers. However, if you’re using Stainless Steel coils you will need to adjust the TCR to match your specific wire unless you are using SS304. But, just to help you guys out here’s a list of TCR settings for each wire.
Ni200: 0.00620
Ti01: 0.00350
SS316L: 0.00092
SS316: 0.000915
SS317L: 0.00088
SS317: 0.000875
SS304: 0.00105
SS430: 0.00138
SS410: 0.00155
If you’re using this mod in TC mode, it may be necessary to double check the TCR settings when you first switch over just to verify that the numbers are at the proper settings.
MEMORY MODE:
Memory mode is used to save various power settings, you have a total of 22 settings that can be saved. You can switch between these by short pressing on the firebar. You can adjust the setting by pressing the +/- buttons. To save the setting and set your device long press the firebar.
PUFFS MENU:
The puffs menu will allow you to limit the maximum number of puffs, from “NEVER” to 999. Make your selection by long pressing the firebar. This will prompt you with the question, “Would you like to reset your puffs?” Answer this by pressing the corresponding +/- button. Minus = Y; Plus = N.
SETTINGS MENU:
From this menu you can adjust the screen time, screen lock, contrast, ohms (which you can use to adjust if the reading is inaccurate after installing a new coil), and you can set it to download the newest firmware (when it’s connected to a PC, even though Smok tells you on the website to remove the batteries before plugging the device up to your computer which removes all the functionality of the device).
I feel the menu selections here are self-explanatory enough that you don’t really need me to go over them with you.
POWER MENU:
This menu feature allows you to power your device off.
HIDDEN FEATURES???:
So, while trying to power my device off, I pressed the firebar 5 times in rapid succession thinking this would power the device off, but instead it locks the device. In my opinion, this is a great feature because I can now safely use this device to build my coils on without having to worry about accidentally pressing the firebar. Also, I can safely store the device in my pocket without worrying about accidentally pressing the *large* firebar on accident.
In my opinion, it has some nice features. I love the size and the information displayed on the screen. This is only the second mod I have owned, but it has been my go to mod since I got it.
")
