
Learn How To Safely Build Coils For Your Rebuildables!
Tools needed to build a coil for rebuildables:
- 2mm x 3mm Screwdrivers (Preferably one Phillips and one Flathead)
- Kanthal A1 Wire (24 gauge or 22 gauge)
- Wire Flush Cutters
- Ohm Reader (Optional)
- Ceramic Tweezers
- Allen Wrench / Hex Screws if RDA post contacts are held down by those types of screws (Usually included with the Rebuidable)
- Wicking material like organic Japanese cotton sheets or Cotton Bacon
- 4 Post-hole RDA for example, Twisted Messes 24mm RDA or Tsunami 24mm RDA are both good starter RDA’s that can lead to intermediate RDAs because of its 4 post holes which make building easier
Rebuildables such as RDA’s, BF RDA’s , RDTA & RTA’s have been a staple in this industry since the beginning. When the first vape shops in California started to pop up, vape enthusiast was only offered higher ohm lower wattage vaping. This lead to a high nicotine content needed to be used in vaping.
When high powered devices using 18650 batteries started to appear in the market, we then saw the rise of the RDA/RBA, which stands for the rebuildable atomizer. We saw a trend of Youtube bloggers posting about different coil builds and coils were being built nonstop in vape shops throughout America.
However, with the rise in the quality of tanks and pod devices, the rebuildable has fallen from its meteoric rise. Think back to 2014 when higher end “American Made Rebuidables” would be priced anywhere between $90-$200.
Although the RDA took a massive dive in the market, it is starting to make it’s renaissance in the vaping market once again! This is due to rebuildables becoming more affordable and the creation of prebuilt coils.
If you want to start learning how to build your own coil that is accessible for a novice RDA vaper, you will first need 24 or 22 gauge Kanthal A1 Wire. Kanthal is a metal alloy that is safe for vaping because of its high toxicity and melting point, you can read about the different types of wire here: Choosing the Correct Vape Coil/Wire Material
We would recommend using a 24 gauge wire for vape enthusiast who likes a cooler vape and a 22 gauge wire for vapers who like a hotter vape.
The gauge of wire also affects how many “wraps” you will need for your wile for your desired resistance. A good starter coil for dual coil users is either an 8 wrap 24-gauge coil or an 8 wrap 22-gauge coil. Either coil is good for beginner use since the resistance would not be too low and would be in an ideal starter RDA range of around .3 ohms depending on the size of screwdriver you are using (we do recommend using a 3mm screwdriver for starters)
How To Build The Coil:
STEP 1: Getting Your Materials Ready
First, you will need your 3mm Screwdriver, tweezers and your Kanthal A1 Wire
STEP 2: Wrapping Your Coil
To wrap a nice tight coil, you would first want your wire to be on top of the screwdriver, making it as close to the handle as you can. Firmly hold the end (or lead) of the wire nearest the screwdriver, with your thumb pressed against the handle of the screwdriver. You then will start wrapping your wire around the screwdriver until you have reached our target of 8 wraps.
- Keep the coils as close to one another as possible without any overlapping.
- Keep the wire tight through the process to eliminate as much slack as possible.
Now that you have made your 8 wraps, both leads should be facing them in the same direction. With one lead being on top and one being on the bottom.
Double check your number of wraps by counting them on the side of the coil that is opposite of the leads. Once you are sure your coils have 8 wraps you can hold one lead firmly with your fingers and pull on the other lead with your tweezers or pliers then repeat with the other lead. This is essential to tension your coil for an accurate build.
Now, remember: DO NOT REMOVE YOUR COIL FROM THE SCREWDRIVER.
STEP 3: Installing Your Coil
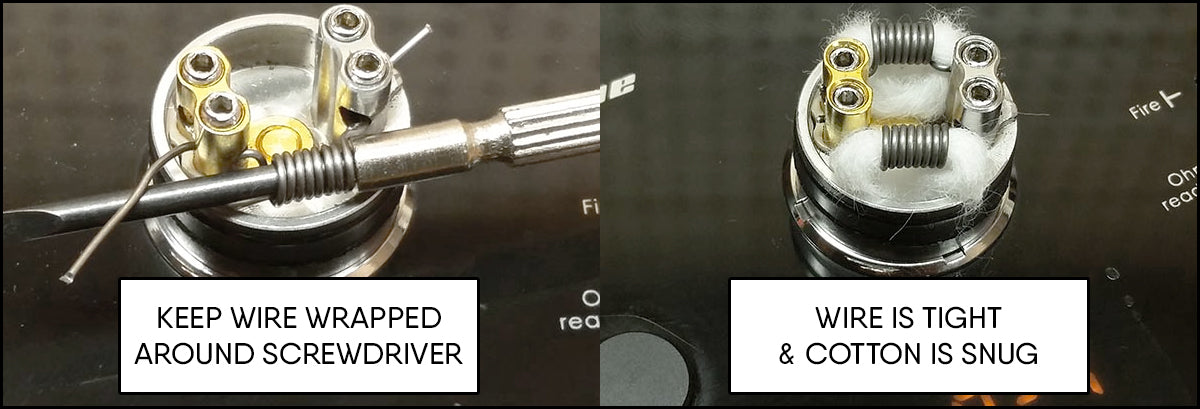
Next, we will want to take the build deck (ideally a four post RDA Build Deck) of your RDA and loosen the post screws most of the way. We do not suggest removing the screws completely because they are easy to lose and hard to put back in when your hands are already full. You will then take your coil (still on the screwdriver) and place one lead in your positive post hole and the other in your negative post. Using the screwdriver currently inside your coil, try to position the coil towards the center of your RDA. Once you have it roughly positioned you can tighten your post screws. Be careful not to over tighten or you might cut the wire inside the post and have to make a new coil. Once your coil is mounted securely, trim the leads as close to the posts as possible.
STEP 4: Firing Your Coil and Getting Rid of Hot Spots
Now that we have made sure your coil is installed properly and there are no shorts, you are ready to put your RDA on to your mod! Once your RDA is installed onto your mod you will want to briefly fire your mod until the coil begins to glow. Once your coils begin to glow stop firing your mod and gently squeeze your coil together with your tweezers. Repeat this process until the coil glows evenly starting from the center moving towards the outer wraps. Another learned trick is to gently run your ceramic tweezers across your coil gently to even out the spacing if you squeeze it too tightly together
STEP 5: Wicking Your Coil with Organic Unbleached Cotton
There are many things you can use to wick your coil with but what we recommend is unbleached organic cotton. You will want a strip of cotton just big enough to snugly fit inside your coil leaving about half an inch on either side. It sometimes helps to either cut a small piece off one end in a 45-degree angle or twist the end of your wick to get it started. Next, push it in from one side of the coil and pull it out the other side. If the cotton does not go through easily you likely are using too much cotton. On the other hand, if your wick is sliding loosely inside the coil there is not enough material. Once your wick is threaded through the coil, take the wick sticking out of each side and trim them so they are just long enough to be folded over to sit on the deck of your RDA. Once your wicks are trimmed, wet them with a few drops of e-juice and fold them on to the RDA deck making sure to not have your cotton under your coil for airflow purposes.
STEP 6: Saturate Your Wicks & Enjoy Your Vape!
Saturate your wicks with your favorite e-juice, replace your RDA’s cap, vape and enjoy! You deserve it!
Last edited: