Become a Patron!

How to properly build on a orchid clone?

drucco99

Member For 4 Years
Hi everyone,
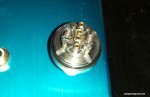
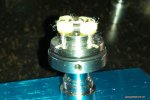
I hope I'm posting this in the right place, if not, feel free to move it. I was wondering if anyone had a good video or instructions on how to build coils for the orchid clone? I have tried building dual coils on it a few times, but was unsuccessful. I am using 28 gauge Kanthal and organic cotton. I figured I'd check here and give it another try before giving up and giving this damn thing away. Any help is appreciated. Thanks.

Sent from my HTC One using Tapatalk
 

drucco99

Member For 4 Years
Hi heateris,
I have some 30g. I will check this out. Thank you for the info.

Sent from my HTC One using Tapatalk
 

Samo_Rock

Member For 4 Years
Member For 3 Years
Member For 2 Years
Member For 1 Year
Member For 5 Years
E="John Malandrucco, post: 89173, member: 3026"] I figured I'd check here and give it another try before giving up and giving this damn thing away. Any help is appreciated. Thanks.

Sent from my HTC One using Tapatalk[/QUOTE]
If you decide the Orchid isn't for you I'll buy it from you. I've been wanting to try one out.
 

drucco99

Member For 4 Years
E="John Malandrucco, post: 89173, member: 3026"] I figured I'd check here and give it another try before giving up and giving this damn thing away. Any help is appreciated. Thanks.

Sent from my HTC One using Tapatalk
If you decide the Orchid isn't for you I'll buy it from you. I've been wanting to try one out.[/QUOTE]

Hi Samo,

If you want it you can pm me and send me an offer. It's brand new. I put juice in it but could never get it to work. I can clean it up real good for you. I just don't have the patience for it, I'll stick with my kayfuns.

Sent from my HTC One using Tapatalk
 

Samo_Rock

Member For 4 Years
Member For 3 Years
Member For 2 Years
Member For 1 Year
Member For 5 Years
If you decide the Orchid isn't for you I'll buy it from you. I've been wanting to try one out.

Hi Samo,

If you want it you can pm me and send me an offer. It's brand new. I put juice in it but could never get it to work. I can clean it up real good for you. I just don't have the patience for it, I'll stick with my kayfuns.

Sent from my HTC One using Tapatalk[/QUOTE]
I've sent a PM
 

TrashCat

Member For 4 Years
I've been using 28g for a while now... Whenever I try go back to 30 (like my last build) I find the wire too delicate.

It breaks easily when adjusting position (after being used for a few days) and coils constantly separate from the ends (of a microcoil touching build) causing hotspots.

I LOVE how much quicker 30g heats up... I just can't handle the down side :(
 

fq06

Gold Contributor
Member For 4 Years
Build it just like a kayfun. Wicks touching the top deck... covering the holes so I guess a little different.

Put the spare small oring on the chimney pipe to get a good solid seal against the top cap for the vacuum seal needed.

I have been using 28 and 29 gauge, 30 is too fragile. 0.7 to 0.8 ohm 2mm id coil. 8 wrap 28 gets 0.7. 8 wrap 29 gets 0.8.
0.7 for fruits and 0.8 for deserts has been what I have found to work best for me but whatever heat range you want just make sure the wick is covering the holes and you have double orings on the chimney and you should be good.

Same vacuum principal as the kayfun so if its not sealed up it will leak. Imo one chimney oring does not seal it up.
Once I figured out how to keep it from leaking I opened up the channels a bit with a dremel. Haven't spent much time dripping since I got it :)
 
Last edited:

fq06

Gold Contributor
Member For 4 Years
Also, make a bend in the wire on the left side to space the coil over to center it over the hole. Didn't torch or finish the coil, just wrapped it quick for this pic.
 

Attachments

  • 2014-09-11 23.21.37.jpg
    2014-09-11 23.21.37.jpg
    78.1 KB · Views: 115
Last edited:

fq06

Gold Contributor
Member For 4 Years
With fasttech selling the v2 for $12, no reason not to try it. Best rta I've tried, haven't tried the fogger yet.

If you're an authentic guy, see if you like it for $12 and if you do go buy the $150 authentic.
 

fq06

Gold Contributor
Member For 4 Years
@John
Needed to rewick (cellucotton) so took a couple pics of how the coils look and with the wick in.
 

Attachments

  • 2014-09-13 07.51.51.jpg
    2014-09-13 07.51.51.jpg
    65.5 KB · Views: 241
  • 2014-09-13 08.01.31.jpg
    2014-09-13 08.01.31.jpg
    81.3 KB · Views: 251

pwnby

Member For 4 Years
Member For 3 Years
Member For 2 Years
Member For 1 Year
Member For 5 Years
I've found that if you use rayon and run it down the juice channels it helps keep it from leaking. I'll try and post some pictures of my build when I get time to take it apart.

For now: the 4nine/orchid combo.
154643b7d5171ad32481b987d266c99b.jpg
 

drucco99

Member For 4 Years
@John
Needed to rewick (cellucotton) so took a couple pics of how the coils look and with the wick in.

Thanks for the pictures. They really helped me to see what I was doing wrong. When I was building it, my coils were off to the side, not centered like yours were. This was not giving me enough room for the chimney to clear the coils. I also had my cotton running down the channels and I think it was choking out the juice flow. I already sold my Orchid to Samo because I was getting frustrated and he loves it. These pictures gave me some hope and I think I'll have to buy another one and give it another shot. Thanks.

Sent from my HTC One using Tapatalk
 

fq06

Gold Contributor
Member For 4 Years
Yeah, I feel wick in the channels choked it out too. I even pulled the channel in at the top and went a little deeper in the vertical channel to get more flow. Sounds like the v2 already comes with deeper channels along with the needed bottom fill.

I think part of the leak problem is that the stock top cap doesn't have a oring in it like all the other kayfun top caps do... like the $6 top fill cap I got from fasttech has.
That's another seal on top of the orings that come on the chimney pressing up against the cap.

Pick up a cheap number to see if you want to stick with it... at least it won't be $150 to give it another go.

By the way, anyone with an orchid, this is just about a necessity... $4.10 to your door. UPS shipping none the less, couple days to my door!
http://www.simsupply.com/dp/B006ERSFUK
 

dave/jayce

Silver Contributor
Member For 5 Years
i love mine and every time i make sure to wick it with jap cotton only and to place some of my wick inside the channels. im using dual 28gauge at .8ish i believe. i havent touched my kayfun since getting. i also think making sure its a bottom fill and not a top fill makes a huge difference
 
Been Running my Orchids for about a month now, i have to say the absolute best build i have found to date is 28 ga 1.5mm micro coils running at .5 ohms, I use the ITEo wicking method (wet the organic cotton with juice before threading it in) make sure that u have good resistance , not too loose when pulling wick through coil. use fingernail clippers and cut wick at a sharp angle, about 60 degrees, put the tip of the wick about 25% down the vertical channel, chain vape away and don't worry about re-wicking for a few days!!! :D
 

pwnby

Member For 4 Years
Member For 3 Years
Member For 2 Years
Member For 1 Year
Member For 5 Years
Good info. I'll try that setup.
 

TheWestPole

Gold Contributor
Member For 4 Years
Build it just like a kayfun. Wicks touching the top deck... covering the holes so I guess a little different.

Put the spare small oring on the chimney pipe to get a good solid seal against the top cap for the vacuum seal needed.

I have been using 28 and 29 gauge, 30 is too fragile. 0.7 to 0.8 ohm 2mm id coil. 8 wrap 28 gets 0.7. 8 wrap 29 gets 0.8.
0.7 for fruits and 0.8 for deserts has been what I have found to work best for me but whatever heat range you want just make sure the wick is covering the holes and you have double orings on the chimney and you should be good.

Same vacuum principal as the kayfun so if its not sealed up it will leak. Imo one chimney oring does not seal it up.
Once I figured out how to keep it from leaking I opened up the channels a bit with a dremel. Haven't spent much time dripping since I got it :)

Totally agree with this build method. I did my first build (dual microcoil 28 ga @ .8 ohm total) wicked it with rayon like a Kayfun (short bend with ends sitting down on the top of the juice channels) and it has worked flawlessly. Have had no need to add an extra o-ring on the chimney. Vapes just like what it is: Kayfun Double. And with the Orchid's dual air holes deep lung hits are effortless. Just breathe in. Orchid is the new standard for me! :D
 

pwnby

Member For 4 Years
Member For 3 Years
Member For 2 Years
Member For 1 Year
Member For 5 Years
I couldn't get mine to stop leaking unless I run some wick down into the juice channels. Gonna try adhdj's method and see if it stops dry hitting.
 

fq06

Gold Contributor
Member For 4 Years
I couldn't get mine to stop leaking unless I run some wick down into the juice channels. Gonna try adhdj's method and see if it stops dry hitting.

Try a second oring on the chimney pipe. May or may not help you... but it won't hurt. You should have a spare in the box.
 

pwnby

Member For 4 Years
Member For 3 Years
Member For 2 Years
Member For 1 Year
Member For 5 Years
I'll try it. It leaks like a sieve out the air holes the way it is lol
 

TheWestPole

Gold Contributor
Member For 4 Years
I love my new Orchid and have been trying some modifications. I have ordered a couple of Taifun GT Nano tanks to increase the juice capacity, but until they come in, I decided to modify the chamber/chimney to get as much capacity out of the stock tank as possible. The stock chimney extends, by my measurement, about 4 mm past the o-ring seal in the top cap. While I will need that extra 4 mm when I attach the Taifun GT tank, it's not needed with the stock tank. So I shortened the chamber 4 mm by grinding off material at the bottom.

P9231525 edit.jpg

The internal threads of the modified chamber bottom out when screwed down, leaving about a 1 mm gap with the base. So I do not get the full 4 mm of extra capacity. However, I do get three improvements: Extra juice capacity (not a full ml, but every little bit helps); a chamber that tightens down firmly and cannot be unintentionally reversed when unscrewing the top cap to refill; and juice channels shortened by about half. Now the juice only has to flow about 2 mm before hitting the wick.
 
Last edited:

fq06

Gold Contributor
Member For 4 Years
I'll try it. It leaks like a sieve out the air holes the way it is lol

If it's leaking, it can not have a positive seal. If it is completely sealed there is no way for it to leak... other than maybe leaving it in a hot car.

Make sure you crank down the base and top cap and try the extra oring... I think that's where you are losing the seal.

Also, fill, cap half way on, turn upside down and tighten the rest of the way.
 
Last edited:

pwnby

Member For 4 Years
Member For 3 Years
Member For 2 Years
Member For 1 Year
Member For 5 Years
Double o ring and a little less cotton in the channels seems to have fixed my issues. Thanks for the advice.

And thanks to those who put up pics.
 

fq06

Gold Contributor
Member For 4 Years
Cool. Over time play around with your build and use less and less wick in the channels... till there's none. Uncork that bad boy :)
 

pwnby

Member For 4 Years
Member For 3 Years
Member For 2 Years
Member For 1 Year
Member For 5 Years
OK I'm down to no cotton in the channels, plus my ipv2 came in the mail today. .3ohms at 50 watts... Its like an all day fresh battery. Love it
 

Sahsah

Member For 4 Years
Member For 3 Years
Build it just like a kayfun. Wicks touching the top deck... covering the holes so I guess a little different.

Put the spare small oring on the chimney pipe to get a good solid seal against the top cap for the vacuum seal needed.

I have been using 28 and 29 gauge, 30 is too fragile. 0.7 to 0.8 ohm 2mm id coil. 8 wrap 28 gets 0.7. 8 wrap 29 gets 0.8.
0.7 for fruits and 0.8 for deserts has been what I have found to work best for me but whatever heat range you want just make sure the wick is covering the holes and you have double orings on the chimney and you should be good.

Same vacuum principal as the kayfun so if its not sealed up it will leak. Imo one chimney oring does not seal it up.
Once I figured out how to keep it from leaking I opened up the channels a bit with a dremel. Haven't spent much time dripping since I got it :)
How did you "open up the channels, could you go into some detail for the DIY-challenged among us, please? Also, when you say cover the holes, do you mean to put the wicks above where the juice channels meet the deck?
 

Sahsah

Member For 4 Years
Member For 3 Years
Yeah, I feel wick in the channels choked it out too. I even pulled the channel in at the top and went a little deeper in the vertical channel to get more flow. Sounds like the v2 already comes with deeper channels along with the needed bottom fill.

I think part of the leak problem is that the stock top cap doesn't have a oring in it like all the other kayfun top caps do... like the $6 top fill cap I got from fasttech has.
That's another seal on top of the orings that come on the chimney pressing up against the cap.

Pick up a cheap number to see if you want to stick with it... at least it won't be $150 to give it another go.

By the way, anyone with an orchid, this is just about a necessity... $4.10 to your door. UPS shipping none the less, couple days to my door!
http://www.simsupply.com/dp/B006ERSFUK
I think this might be why the problem of leaking is coming up: the orchid does come with an ring for the top cap, it's not supposed to go on the chimney, it's supposed to be seated in the top cap and then the chimney pushes up against it creating the seal.
Here's what it should look like:
67rjq7z.jpg

Ps. You have no idea how happy I am to finally have figured out how to post actual photos onto forums, instead of just the url link. This is a historic and momentous occasion in my forum-posting career =] lol
 
Last edited:

Sahsah

Member For 4 Years
Member For 3 Years
I love my new Orchid and have been trying some modifications. I have ordered a couple of Taifun GT Nano tanks to increase the juice capacity, but until they come in, I decided to modify the chamber/chimney to get as much capacity out of the stock tank as possible. The stock chimney extends, by my measurement, about 4 mm past the o-ring seal in the top cap. While I will need that extra 4 mm when I attach the Taifun GT tank, it's not needed with the stock tank. So I shortened the chamber 4 mm by grinding off material at the bottom.

View attachment 6179

The internal threads of the modified chamber bottom out when screwed down, leaving about a 1 mm gap with the base. So I do not get the full 4 mm of extra capacity. However, I do get three improvements: Extra juice capacity (not a full ml, but every little bit helps); a chamber that tightens down firmly and cannot be unintentionally reversed when unscrewing the top cap to refill; and juice channels shortened by about half. Now the juice only has to flow about 2 mm before hitting the wick.
Have you noticed any substantial improvements in wicking and flavor from this modification to your orchid? Also, how did you go about removing that much of the chimney, because that's a substantial amount of stainless steel. I'll tell you one thing, I'd bet my ADV you didn't do it with a nail-file....well, unless you're really in the mood to drum-up some of those good ol' "escaping from Shawshank" dramatics, even if the circumstances that precipitate the aforementioned drama are contrived...
 

fq06

Gold Contributor
Member For 4 Years
How did you "open up the channels, could you go into some detail for the DIY-challenged among us, please? Also, when you say cover the holes, do you mean to put the wicks above where the juice channels meet the deck?

I used a small diamond grinding bit for the dremel, it was just the smallest bit i had, doesn't have to be a diamond bit.
http://www.expresstools.com/DREMEL-...7LugWiL6R4YB1MCWK9OJJfIiWilI7CmzuSRoC3rnw_wcB
Just reamed the channels out a bit more.

Yes, wicks cut to where they just hang down and touch the deck. If you have a good vacume seal, you don't have to plug the juice channels with wick.

I think this might be why the problem of leaking is coming up: the orchid does come with an ring for the top cap, it's not supposed to go on the chimney, it's supposed to be seated in the top cap and then the chimney pushes up against it creating the seal.
Here's what it should look like:

The first orchids didn't have the oring in the cap. V2 and up got the oring in the cap and sealed it up.
 

TheWestPole

Gold Contributor
Member For 4 Years
Have you noticed any substantial improvements in wicking and flavor from this modification to your orchid? Also, how did you go about removing that much of the chimney, because that's a substantial amount of stainless steel. I'll tell you one thing, I'd bet my ADV you didn't do it with a nail-file....well, unless you're really in the mood to drum-up some of those good ol' "escaping from Shawshank" dramatics, even if the circumstances that precipitate the aforementioned drama are contrived...

I can't say I noticed improved wicking from the shortened chamber/chimney. Was wicking great before and after. The benefit was extra capacity with short tanks. For short tanks (Kayfun Bell, etc.) I still use those shortened chamber/chimneys.

I removed the material from the chamber end using a bench sander, and cleaned up the thread lead-in by chucking the chimney in a drill press and using sandpaper and steel wool.
 

fq06

Gold Contributor
Member For 4 Years
How did you "open up the channels, could you go into some detail for the DIY-challenged among us, please? Also, when you say cover the holes, do you mean to put the wicks above where the juice channels meet the deck?

Found a pic of the vox v1 that I ground some material out of the channels. The one on the right is the newer v2 with deeper channels from the factory... about the same as the v1 that I modded.

2014-09-22183136.jpg
 

Sahsah

Member For 4 Years
Member For 3 Years
Hi heateris,
I have some 30g. I will check this out. Thank you for the info.

Sent from my HTC One using Tapatalk
I'm gonna have to disagree w mr 30 guage, you had it right the first time, 28 guage is the way to go, just do a 7/6 wrap around a 5/64th drill bit( equivalent to about 1.8 mm) good luck. Make sure you get the wicking correct, that's where 90% of ppl screw up their orchid builds and this get dry hits.
 

Sahsah

Member For 4 Years
Member For 3 Years
I couldn't get mine to stop leaking unless I run some wick down into the juice channels. Gonna try adhdj's method and see if it stops dry hitting.
Probably due to wicking, I'm guessing too much cotton and not tucked neatly/securely enough.
 

Sahsah

Member For 4 Years
Member For 3 Years
If it's leaking, it can not have a positive seal. If it is completely sealed there is no way for it to leak... other than maybe leaving it in a hot car.

Make sure you crank down the base and top cap and try the extra oring... I think that's where you are losing the seal.

Also, fill, cap half way on, turn upside down and tighten the rest of the way.
I've also found that blocking the chimney with a well placed thumb or some tissue paper held in place the entire time from when you unscrew to refill, until the screw is secured back in place and tightened down, helps to make sure your vacuum is not being messed with and helps a lot with wicking/leaking. I know it sounds like a minor thing, but in my experience it makes a significant difference.
 

Sahsah

Member For 4 Years
Member For 3 Years
said:
The first orchids didn't have the oring in the cap. V2 and up got the oring in the cap and sealed it up.

Ahh, ok, I was unaware of that. How did they succeed in creating the necessary seal in the version one authentics and clones if that's the case?? Strange that they wouldn't include that feature, since the KAYFUN had already layed out that part of the blueprint for them way beforehand, thus establishing as a proven method to ensurie a fool-proof seal every time
 

Hey! it's just Ray...

Silver Contributor
Member For 5 Years
You guys got me wantin' to dig through my desk drawer and find my v4.
Anyone got a piece of 30 gage I can borrow till I get some more ordered in? :D
 

fq06

Gold Contributor
Member For 4 Years
The oring is on the chimney and pushes up against the top cap. With only 1 oring there is not enough pressure to get a seal. Add the spare oring that came in the spares and you now have enough pressure to get a seal. That was the authentics blunder and the clones followed 1:1.

This is history now though, the clones have had the oring in the top cap since v2. If anyone is still running a v1 I'm sure they have the top fill cap that has the oring in it or they, like most of us are on version 18 lol.

Imo top fill died with v2+ bottom fill so that is also now in the history books.
 

fq06

Gold Contributor
Member For 4 Years
I sent some 34g to you ray, should be a nice cool 2.5 ohm dual coil build on your mech lol.
 

fq06

Gold Contributor
Member For 4 Years
Tongue in cheek. Sorry, I thought you were kidding about 30g :oops:

I would say that 28 is about the thinnest wire you should use unless your building it for a low power regulated device that needs to be higher than one ohm.

What battery are you using with the orchid? I would actually mail some wire to you try before you go buy a spool of 30g. Imo you will be buying another spool or two in short time.
 
Last edited:

fq06

Gold Contributor
Member For 4 Years
I looked through your posts and you have a 12w low power regulated.
If it were going to try use the orchid, I would put a grub screw in the one air hole to close it off and build it single coil. Or get a kayfun or something designed to be single coil.

I'm making assumptions here, but if those assumptions are right, single coil is about all you can use with success.
 

VU Sponsors

Top